
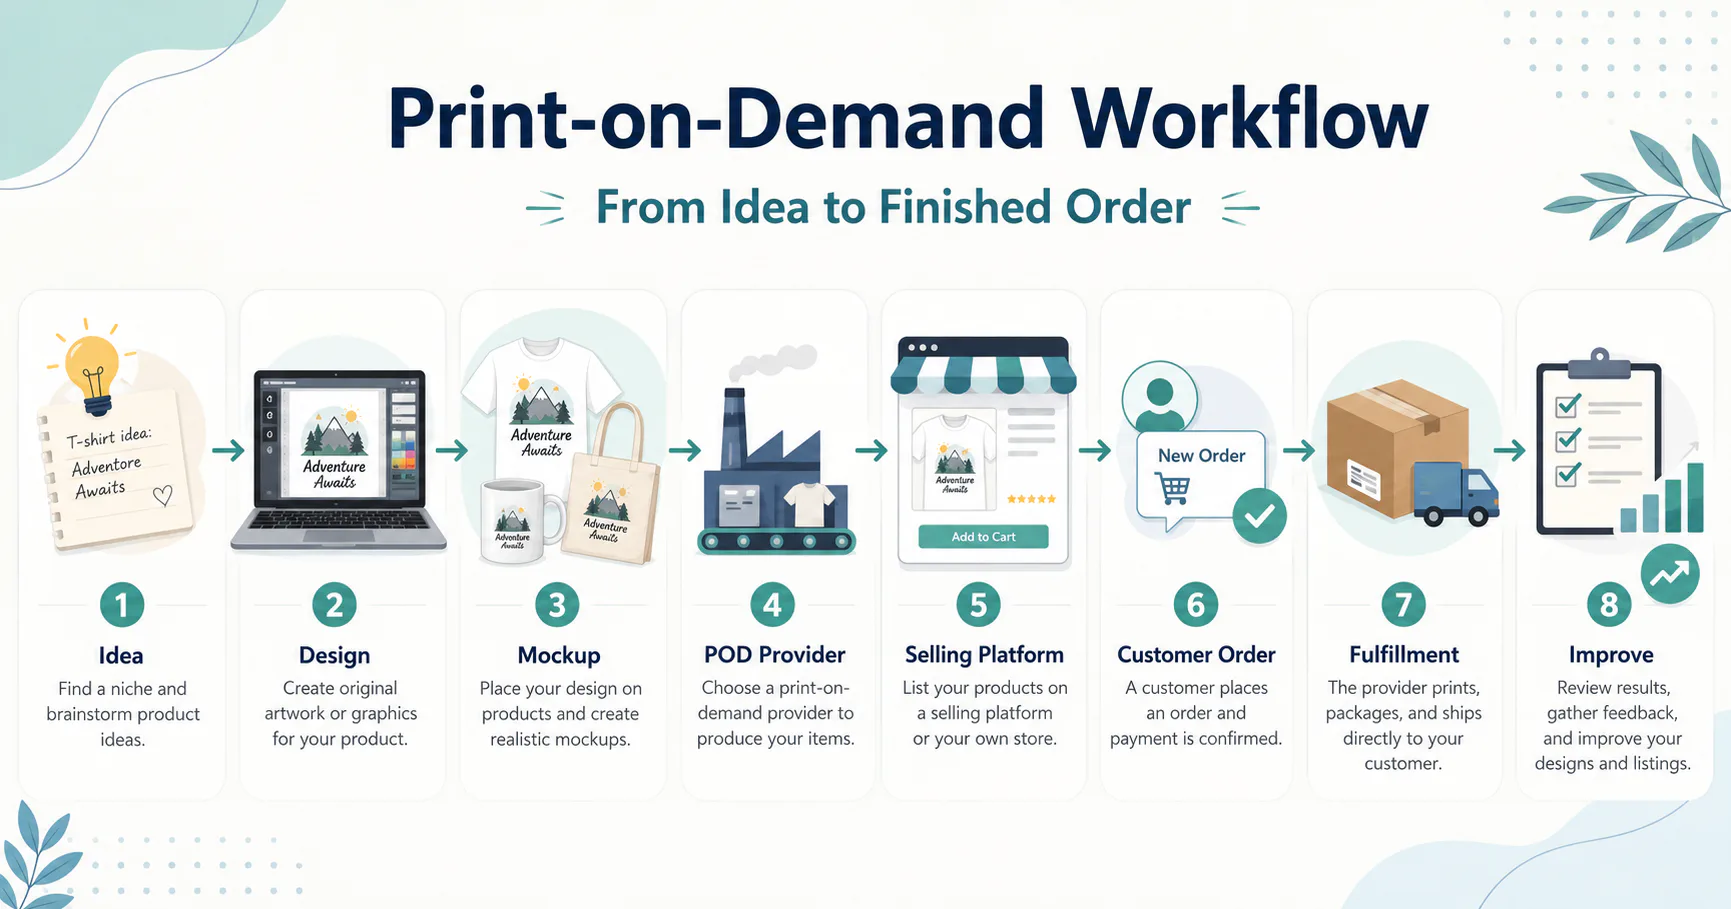
Print-on-Demand Workflow for Beginners: From Idea to Finished Order
Print-on-demand can feel confusing when you are just getting started.
You may hear about designs, mockups, Etsy, Shopify, Printify, Printful, Canva, Kittl, and a dozen other tools before you understand how the basic process works.
The good news is that the print-on-demand workflow is easier to understand when you break it into a simple sequence.
This article explains the basic workflow from product idea to finished order, without turning it into a giant business course.
Who This Article Is For
This article is for beginners who are trying to understand how print-on-demand actually works.
It may be helpful if:
- You are new to print-on-demand
- You want to sell custom products but do not understand the full process yet
- You are comparing POD tools but feel overwhelmed
- You understand pieces of the process, but not how they connect
- You want a simple workflow before choosing tools or publishing products
If you are brand new, you may also want to read How to Start Print-on-Demand as a Beginner first.
If you are trying to understand the tools involved, read What Tools Do You Need to Start Print-on-Demand? after this article.
The Simple Print-on-Demand Workflow
The basic print-on-demand workflow looks like this:
- Start with a product idea
- Create or prepare the design
- Make a product mockup
- Choose a POD provider
- Choose a selling platform
- A customer places an order
- The order is fulfilled
- You improve over time
That is the main process.
There are more details inside each step, but beginners do not need to learn everything at once. The goal is to understand how the pieces fit together first.
What Print-on-Demand Means
Print-on-demand usually means a product is made after a customer places an order.
Instead of buying a large amount of inventory upfront, the seller creates or uploads a design, places it on a product, and uses a POD provider to help produce and ship the item when someone buys it.
Common POD products include things like:
- T-shirts
- Sweatshirts
- Mugs
- Tote bags
- Posters
- Phone cases
- Stickers
- Home decor products
The exact products available depend on the provider you use.
A POD provider may help with printing, packing, and shipping, but that does not mean the provider does everything for you. The seller is still responsible for product ideas, listings, pricing, customer service, platform rules, and improving the shop over time.
Step 1: Start With a Product Idea
The workflow starts with an idea.
This could be:
- A phrase
- A theme
- A niche
- A design style
- A gift idea
- A target audience
- A product type
For example, a beginner might start with an idea like “funny teacher mug,” “Christian dad shirt,” “pickleball gift,” or “minimal coffee quote design.”
At this stage, you do not need a complicated business plan. You just need a clear starting point.
A simple beginner question is:
Who is this product for, and why would they care about it?
That question helps you avoid creating random designs with no clear audience.
Step 2: Create or Prepare the Design
After you have an idea, the next step is creating or preparing the design.
This might include:
- Text
- Simple graphics
- Illustration-style elements
- Typography
- Layout
- Color choices
- Product placement
Tools like Canva and Kittl may be useful for beginners because they can help create graphics, text layouts, and product-style designs.
You can read more here:
- Canva Review
- Kittl Review
One important caution: design licensing matters.
Before selling products using assets, templates, graphics, fonts, or AI-generated elements from any tool, review the current licensing rules on the official website. Do not assume every design element is automatically safe to sell on merchandise.
A safer beginner habit is to create designs that are meaningfully original, not just copied from a template or made from standalone stock elements.
Step 3: Create a Product Mockup
A mockup shows what your design may look like on a product.
For example, a mockup might show your design on:
- A t-shirt
- A mug
- A sweatshirt
- A tote bag
- A wall art print
Mockups are useful because they help customers understand what the product may look like before they buy.
They can also help you check basic placement, sizing, and readability.
However, a mockup is still a preview. It does not guarantee the final print will look exactly the same in real life. Colors, sizing, placement, garment type, and print method can affect the final result.
That is why samples or quality checks can be helpful when possible.
Step 4: Choose a POD Provider
A POD provider is the company or platform that helps produce and ship the product after an order is placed.
Examples of POD providers include:
- Printify
- Printful
- Gelato
- Gooten
You can read more about these options here:
- Printify Review
- Printful Review
- Gelato Review
- Gooten Review
For beginners, the important thing is to understand what a POD provider does.
A POD provider may help with:
- Product selection
- Print production
- Order fulfillment
- Packing
- Shipping
- Integration with selling platforms
But a POD provider is not the same thing as a marketplace.
It helps produce and fulfill the product. It does not automatically bring customers to your listing.
Step 5: Choose a Selling Platform
A selling platform is where customers buy your product.
Examples include:
- Etsy
- Shopify
- Amazon
- TikTok Shop
- eBay
Each platform has its own rules, fees, listing requirements, and customer expectations.
For example, Etsy sellers using production partners should review Etsy’s current production partner disclosure rules. If AI tools are used in creating a product, marketplace disclosure rules may also apply.
This is one of the reasons beginners should avoid rushing.
Before publishing products, make sure you understand the basic rules of the platform you are using.
A simple way to think about it:
The POD provider helps make and ship the product. The selling platform is where the customer buys it.
Those are two different parts of the workflow.
Step 6: A Customer Places an Order
Once your product is listed, a customer can place an order through your selling platform.
Depending on your setup, the order may be sent to your POD provider automatically through an integration, or you may need to manage parts of the order process manually.
This depends on the platform, provider, and integration you are using.
At this stage, the seller still needs to pay attention to:
- Product cost
- Shipping cost
- Retail price
- Processing time
- Customer messages
- Order status
- Marketplace rules
- Refund or replacement policies
POD can reduce the need to manage inventory, but it does not remove responsibility from the seller.
Step 7: The Order Is Fulfilled
After the order is received, the POD provider may print, pack, and ship the product to the customer.
This is the fulfillment part of the workflow.
Beginners should pay attention to:
- Production time
- Shipping time
- Tracking information
- Print quality
- Product sizing
- Customer expectations
- Possible delays
- Provider support policies
It is also important to understand that production time and shipping time are not always the same thing.
Production time is how long it may take to make the product.
Shipping time is how long it may take to deliver the product after it is shipped.
Both can affect the customer experience.
Step 8: Improve Over Time
Print-on-demand is not usually a one-time setup where everything works perfectly after one listing.
Over time, sellers may need to improve:
- Product ideas
- Designs
- Mockups
- Listing photos
- Product descriptions
- Pricing
- Keywords
- Product selection
- Provider choice
- Customer service
- Quality checks
- Workflow organization
This does not mean you need to fix everything at once.
A beginner-friendly approach is to start simple, publish carefully, and improve based on what you learn.
Common Beginner Mistakes to Avoid
Print-on-demand becomes harder when beginners try to skip the basic workflow.
Here are some common mistakes to watch for.
Mistake 1: Not Understanding the Full Sequence
Some beginners jump straight into tools without understanding the process.
They may open Canva, browse Printify, create an Etsy account, and watch several tutorials, but still not understand how the order moves from idea to customer delivery.
Before adding more tools, make sure you understand the basic sequence:
Idea → design → mockup → POD provider → selling platform → customer order → fulfillment → improvement
Mistake 2: Thinking a POD Provider Is the Same as a Selling Platform
This is a common source of confusion.
A POD provider helps produce and fulfill the product.
A selling platform is where customers buy the product.
For example, Printify and Printful are provider options. Etsy and Shopify are selling platform options.
They work together, but they are not the same thing.
Mistake 3: Thinking POD Means a Free Business
Print-on-demand can reduce the need to buy inventory upfront, but that does not mean there are no costs.
Possible costs may include:
- Product base costs
- Shipping costs
- Marketplace fees
- Payment processing fees
- Sample orders
- Design tools
- Storefront subscriptions
- Ads, if used
- Taxes or business expenses where applicable
It is better to think of POD as a lower-inventory model, not a no-cost business.
Mistake 4: Skipping Platform Rules
Every selling platform has rules.
If you sell on Etsy, review Etsy’s current rules for production partners, handmade standards, shipping details, and AI disclosure if relevant.
If you sell on Amazon, TikTok Shop, Shopify, or eBay, review their current seller rules before publishing products there.
Rules can change, so always verify details on the official website.
Mistake 5: Ignoring Design Licensing
Just because you can create a design with a tool does not automatically mean every element is safe to sell on a physical product.
Before using Canva, Kittl, stock graphics, fonts, templates, or AI-generated artwork, check the current license terms.
This is especially important for merchandise, because you are putting the design on a product for sale.
Mistake 6: Trying to Use Too Many Tools Too Early
Beginners often get overwhelmed because they try to learn everything at once.
They may try to use several design tools, multiple POD providers, Etsy SEO tools, Shopify apps, AI tools, mockup tools, keyword tools, and automation tools before publishing anything useful.
A simpler starting point is:
- One product idea
- One design tool
- One POD provider
- One selling platform
- One simple tracking system
You can add more later.
Mistake 7: Skipping Quality Checks
POD products are physical products.
That means quality matters.
When possible, consider ordering samples or checking product quality before relying heavily on a product. At minimum, review product details carefully, including sizing, materials, print area, production time, and shipping expectations.
Mockups are helpful, but they are not a replacement for understanding the actual product.
A Simple Beginner POD Workflow Example
Here is a simple example of how the workflow might look.
A beginner decides to create a funny coffee mug for remote workers.
They create a simple text-based design in a design tool.
They place the design on a mug mockup.
They choose a POD provider that offers mugs.
They list the product on a selling platform.
A customer places an order.
The order is sent to the POD provider.
The provider prints and ships the mug.
The seller checks the order status, handles customer service if needed, and improves the listing over time.
That is the basic workflow.
It does not need to be complicated at the beginning.
What To Focus On First
If you are new to print-on-demand, focus on understanding the workflow before comparing every possible tool.
Start with these questions:
- What type of product do I want to create?
- Who is the product for?
- What design do I need?
- Which POD provider can make the product?
- Where will I list it for sale?
- What rules do I need to review before publishing?
- How will I track my product ideas and listings?
A simple spreadsheet, checklist, or project board can help you keep track of ideas, designs, providers, listings, and updates.
You do not need a complicated system to begin.
Final Recommendation
Print-on-demand is easier to understand when you see it as a workflow instead of a pile of disconnected tools.
The basic process is:
Start with an idea, create a design, place it on a product, choose a provider, list it on a selling platform, let the provider fulfill the order, and improve over time.
Before adding more tools, make sure you understand where each tool fits.
A design tool helps you create the artwork.
A POD provider helps produce and ship the product.
A selling platform gives customers a place to buy.
Those three parts work together, but they each serve a different purpose.
Simple Next Step
If you are still learning the basics, read What Tools Do You Need to Start Print-on-Demand? next.
If you are ready to compare beginner-friendly options, visit the POD Resources page to browse design tools, fulfillment providers, and other print-on-demand resources by category.
Related resources
INTERNAL LINKS TO ADD
How to Start Print-on-Demand as a Beginner
What Tools Do You Need to Start Print-on-Demand?
Canva Review
Kittl Review
Printify Review
Printful Review
Gelato Review
Gooten Review
POD Resources Page
RELATED RESOURCES
How to Start Print-on-Demand as a Beginner: /blog/how-to-start-print-on-demand
What Tools Do You Need to Start Print-on-Demand?: /blog/what-tools-do-you-need-to-start-print-on-demand
Canva Review: /canva-review
Kittl Review: /kittl-review
Printify Review: /printify-review
Printful Review: /printful-review
Gelato Review: /gelato-review
Gooten Review: /gooten-review
POD Resources Page: MISSING — confirm URL slug
Commercial Licensing Guide: MISSING — placeholder link, create later
Etsy POD Keyword Research Guide: MISSING — placeholder link, create later
Mockup Tools for POD Sellers: MISSING — placeholder link, create later
How to Choose a POD Provider: MISSING — placeholder link, create later
Best POD Design Tools: MISSING — placeholder link, create later
Simple POD Tracking Spreadsheet: MISSING — placeholder link, create later
Etsy vs Shopify for POD Beginners: MISSING — placeholder link, create later
Visit the POD Resources page to browse design tools, fulfillment providers, and other print-on-demand resources by category.